Tips and tricks for low light photography
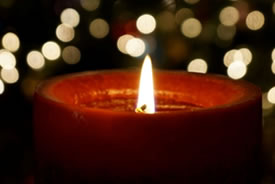
1/13 F5.6 ISO 400 (Photo by Amy Anastasopoulos/NCC staff)
A few years ago, I dropped my little Coolpix camera in the Lake Saint-Jean in Quebec while kayaking with my sister and cousin. Despite leaving the camera body, memory card and battery in a bag of rice for four days, my poor Coolpix was never the same.
As a consolation gift to myself, I purchased what I call my “fancy camera”: a Sony a57 DSLR with 18-55mm lens. I wanted a camera that I could control so that I could take the pictures I want, not the ones my camera takes for me.
For almost a year and a half I used my camera on automatic mode, thinking my pictures were so great and so clear, all thanks to my “fancy camera.” Then I took a course on how to use my camera on manual mode and thought to myself “Why haven’t I been doing this for the past 18 MONTHS?”
Your DSLR camera on manual mode can take some amazing pictures!
As an amateur photographer who still struggles occasionally with her manual camera settings, I love getting tips on how to make my life easier, and make my shots more interesting.
The sun has been setting so early for the past couple of months that I’ve been taking lots of time for nature, wandering around my neighbourhood in the evening and experimenting with low light shots of natural settings. Here are a few tricks and tips I’ve discovered that make my life easier when taking low light images with my DSLR:
Ignore your light meter
I was taught to trust my camera’s light meter for regular daytime photography to ensure that my images were not under or overexposed. For night shots, that rule goes out the window! Your shots will be based more on trial and error, and less on your camera’s intuitiveness.
Low ISO
The assumption is that low light conditions require a higher ISO. However, the truth is that the higher your ISO, the more grain, or noise, you’ll see in your pictures.
Consider the images below:
The first picture, using an ISO of only 100, produces a sharp and clear image:
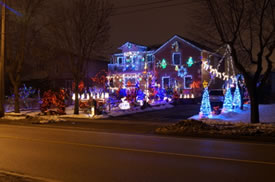
10" shutter speed F9.0 ISO 100 (Photo by Amy Anastasopoulos/NCC staff)
You can see that the second image, with an ISO of 3200, is grainier, especially in the sky and foreground:
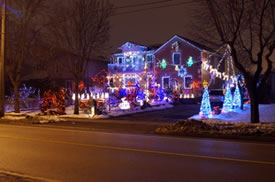
¼ shutter speed F7.1 ISO 3200 (Photo by Amy Anastasopoulos/NCC staff)
In the third image, an ISO of 6400 produces even more grain:
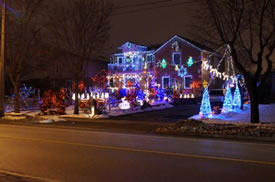
1/10 shutter speed F7.1 ISO 6400 (Photo by Amy Anastasopoulos/NCC staff)
Set your ISO as low as possible and balance it out with your other camera settings: shutter speed and aperture.

10" shutter speed F9.0 ISO 100 (Photo by Amy Anastasopoulos/NCC staff)
Slow shutter speed
Use a long shutter speed to allow your camera to capture more light. Despite using a very low ISO in the image to the right, my camera captured the light because its shutter speed was set at ten whole seconds. In other words, when I pressed my camera’s shutter release button, the camera’s shutter stayed open for 10 seconds before capturing the image.
This tip is also true when it comes to photographing dark nature scenes with very little or no light. If you don’t see much light, neither will your camera and you may have to use long exposures of several minutes. In that case, use your BULB (B) shutter speed setting. This will leave your shutter open for as long as your shutter release button is pressed.
Of course, standing around holding a button for several minutes can become uncomfortable, boring and tedious. If you enjoy taking pictures at night, consider investing in a remote trigger that allows you to set the amount of time you’d like your shutter to remain open.
Aperture
When you have a small light source, such as a streetlight, use a small aperture opening such as F18 or F22. It will let in less light, cut out lens flare, and create nice starburst patterns out of your light source.
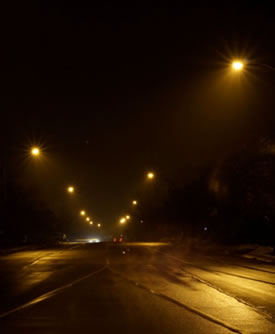
F22 - creates nice starburst patterns and cuts lens flare (Photo by Amy Anastasopoulos/NCC staff) |
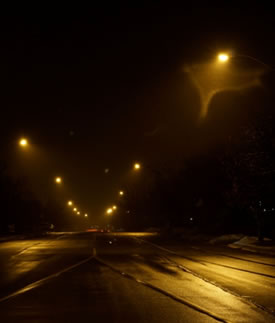
F11 - more lens flare (Photo by Amy Anastasopoulos/NCC staff) |

1/13 F5.6 ISO 400 (Photo by Amy Anastasopoulos/NCC staff)
Bokeh
Get creative with your images and use shallow depth of field to capture a light source. This will make your lights look like glowing orbs. I find this works especially nicely for Christmas tree lights.
To produce shallow depth of field, ensure there is as much distance as possible between your subject and its background, get very close to your subject, zoom your camera lens all the way in and select a bigger aperture opening, such as F5.6 (or smaller, depending on your camera lens).
Bokeh can also be achieved while outdoors in nature. If you’re taking time for nature in the city, you’re likely somewhere with lights: streetlights, house lights, car lights, traffic signals, shop signs or Christmas lights if it’s the right season. Using the same bokeh tips above, you can create creative and artistic images by focusing on your foreground. In fact, night shots where you have multiple light sources make for interesting bokeh pictures.
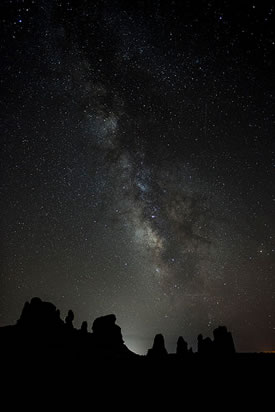
Night sky at the window (Photo by Arches National Park, Wikimedia Commons)
Landscapes
Shooting dark landscapes with a moon and/or bright stars can be tricky. Exposing for the landscape can make your moon and stars look like bright blobs in the sky. In turn, exposing for the sky will likely turn your landscape into a silhouette, which can often make a compelling image, like in the photograph to the left.
In order to create an image with a properly exposed landscape and sky, try taking two separate photos, exposing for the landscape in one and the sky in the other, and then merging them in your photography software.
Automatic Focus vs. Manual focus
In low light, whether in a dark field, forest or side street, your camera lens may not be able to focus properly while on Automatic Focus (AF). I’ve discovered two solutions to get around this issue:
1. Switch your lens to Manual Focus (MF).
2. Using a flashlight, set it down in front of your camera. Press your camera’s shutter release button halfway so that it focuses on the light, then release the shutter button and set your lens to MF. If you don’t move your camera, you will not need to refocus your lens. Remember to remove the flashlight before taking your picture.
Reduce camera shake
During long exposures (ie: when you’ve set a long shutter speed), simply the movement of you pressing down the shutter release button on your camera can be registered as camera shake, making your picture come out blurry. To avoid this, use a remote trigger. If you’re like me and you don’t have a remote trigger, set the 10-second self-timer on your camera. The 10 seconds after you push down the shutter release button will allow your camera to settle from any movement.
Use a tripod
If you don’t have a tripod, use a table, ledge or any solid surface available. This will help keep the camera steady during long night exposures.
Now that you’re equipped with tips and tricks to make low light photography that much easier, take some time for nature this holiday season.
What kind of interesting images can you come up with? Do you have any tips you can share?


